The pivot table is a dynamic data summary tool used for the analysis of health information data, it allows one to generate and arrange data with regards to its dimensions, which is helpful in spotting patterns and relationships that would be otherwise invisible.
The pivot table can be found as an application in the Kenya Health Information System software (KHIS/DHIS2) and it has the flexibility of arranging data into columns, rows and fields using available data dimensions. Examples of data dimensions are data elements, indicators, events, period, and organization hierarchy
This versatility of pivot tables proves that it’s a fundamental data management tool that all Health Information Managers need to have in their tool box. Ergo the purpose of this easy step by step tutorial on how to generate pivot tables in the Kenya Health Information System software (KHIS/DHIS2).
Click here to find out how to generate pivot tables using Microsoft Excel.
By the end of this tutorial you will be able to select the dimensions for creating a pivot table, format the pivot table using the layout functionality, how to save your generated pivot table as favorite and finally, how to export the pivot table into the myriad of available formats.
Without further ado, let get right to it.
Step 1: Log in to Kenya Health Information System Aggregate website
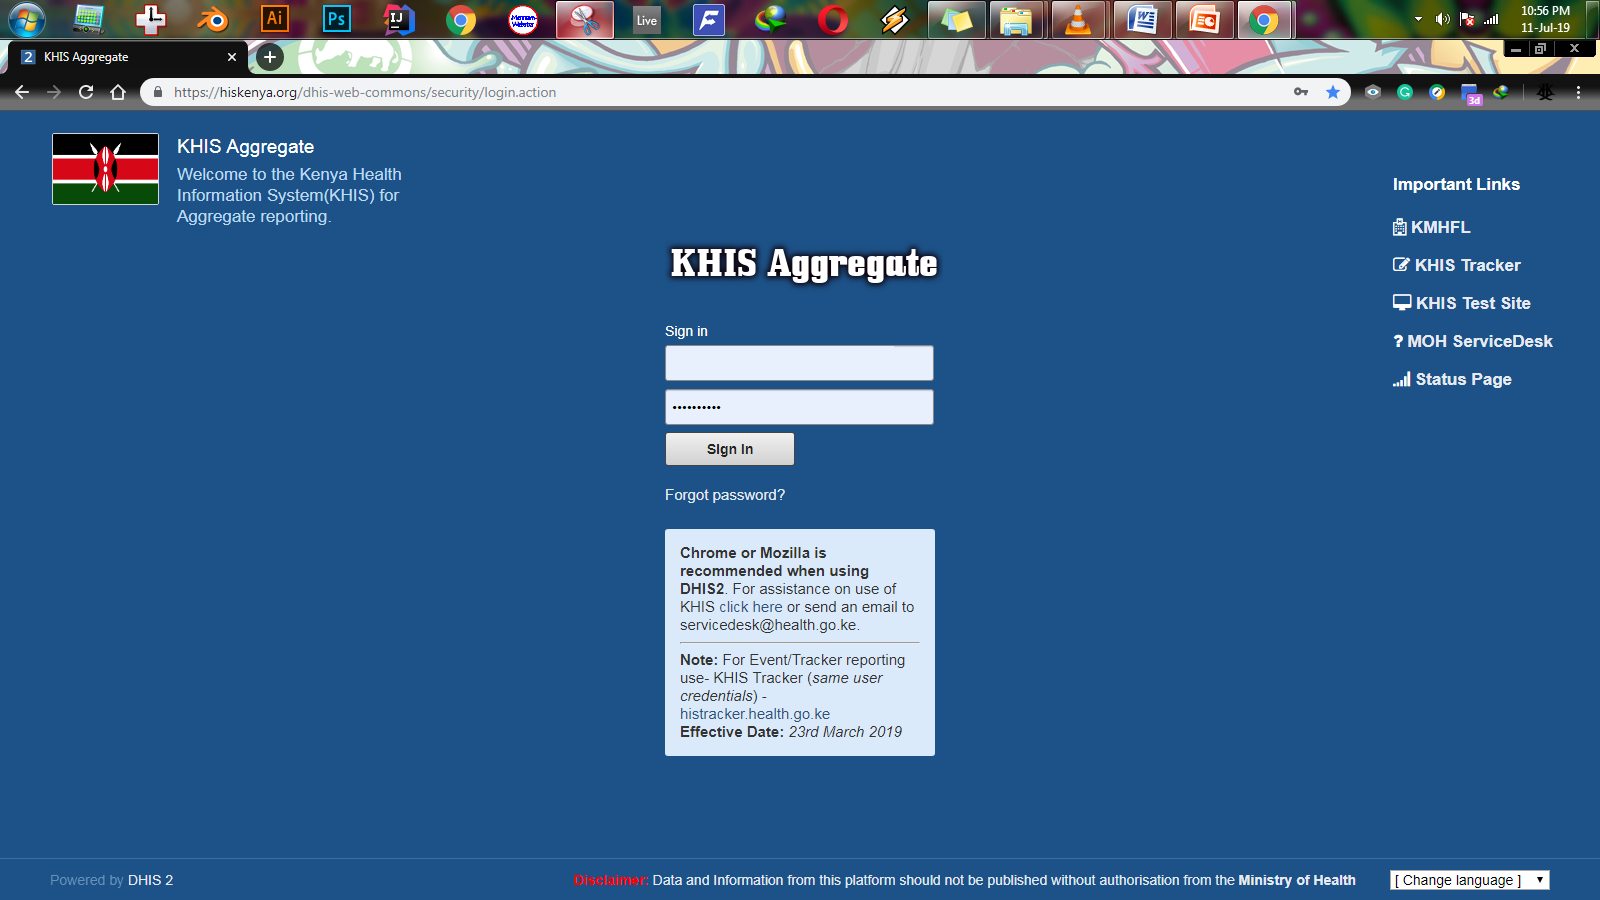
For you to create a pivot table you first have to login to the KHIS site using the credentials you provided when applying for a KHIS/DHIS2 account. If you do not have an account, please click here to find out how to apply for a Kenya Health Information System account. Click the link below to go to the KHIS Aggregate log in page.
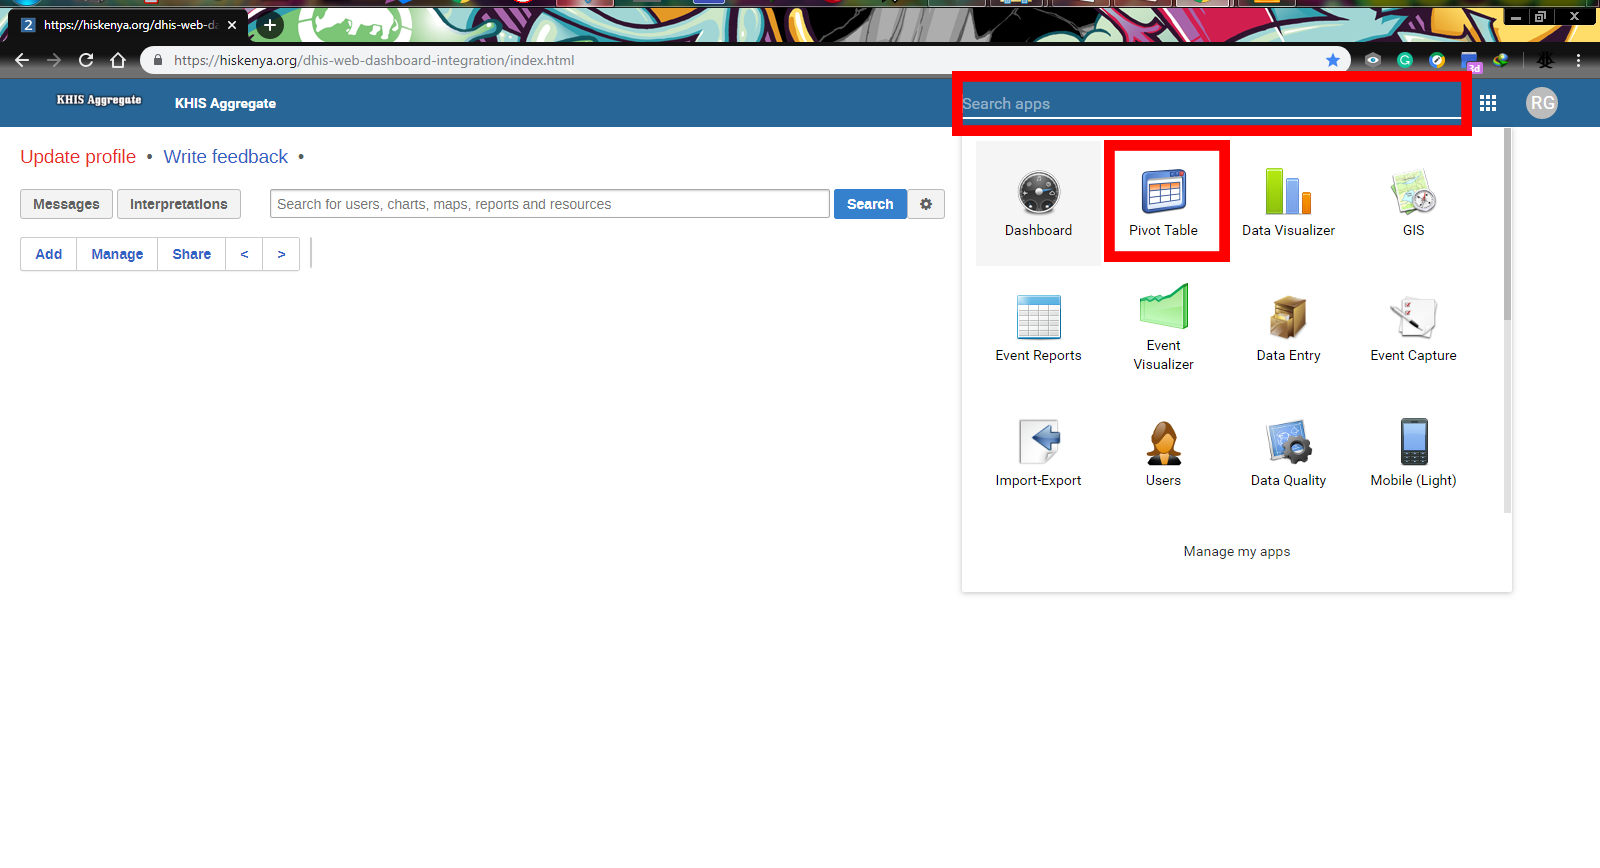
After successfully logging in, you will automatically land on your dashboard. Click on the SEARCH BOX in the top right corner – as shown in the image above, and you’ll be provided with a drop-down list of all applications available for your account including the pivot table. Click on the PIVOT TABLE application and proceed to the next step of creating a pivot table in the KHIS Aggregate site.
Step 2: Select data dimensions
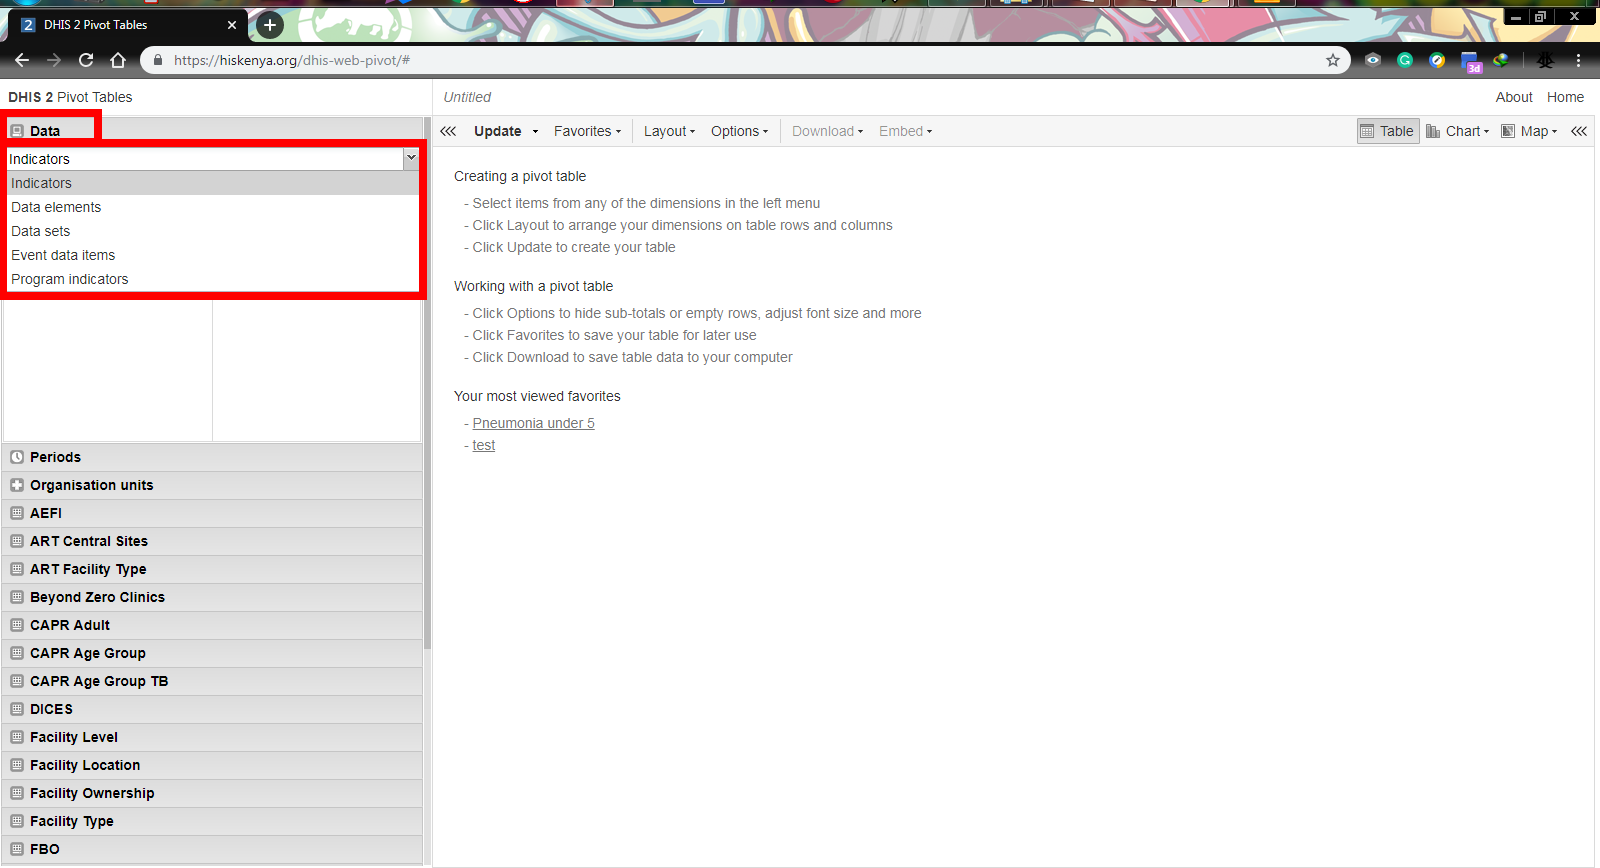
You are now on the pivot table page and in this step you are going to select the data dimensions you want for your pivot table. Here you can select different data dimensions depending on the information you want.
Click on the DATA tab then click on the small downward arrow to display a drop-down list of available data dimensions i.e. indicators, data elements, data sets, event data items and program indicators. Select your desired data dimension (for purposes of this tutorial, I’ll use data elements with MOH &711 ANC-PMTCT as the data element group) and proceed to the next step.
Step 3: Select data elements
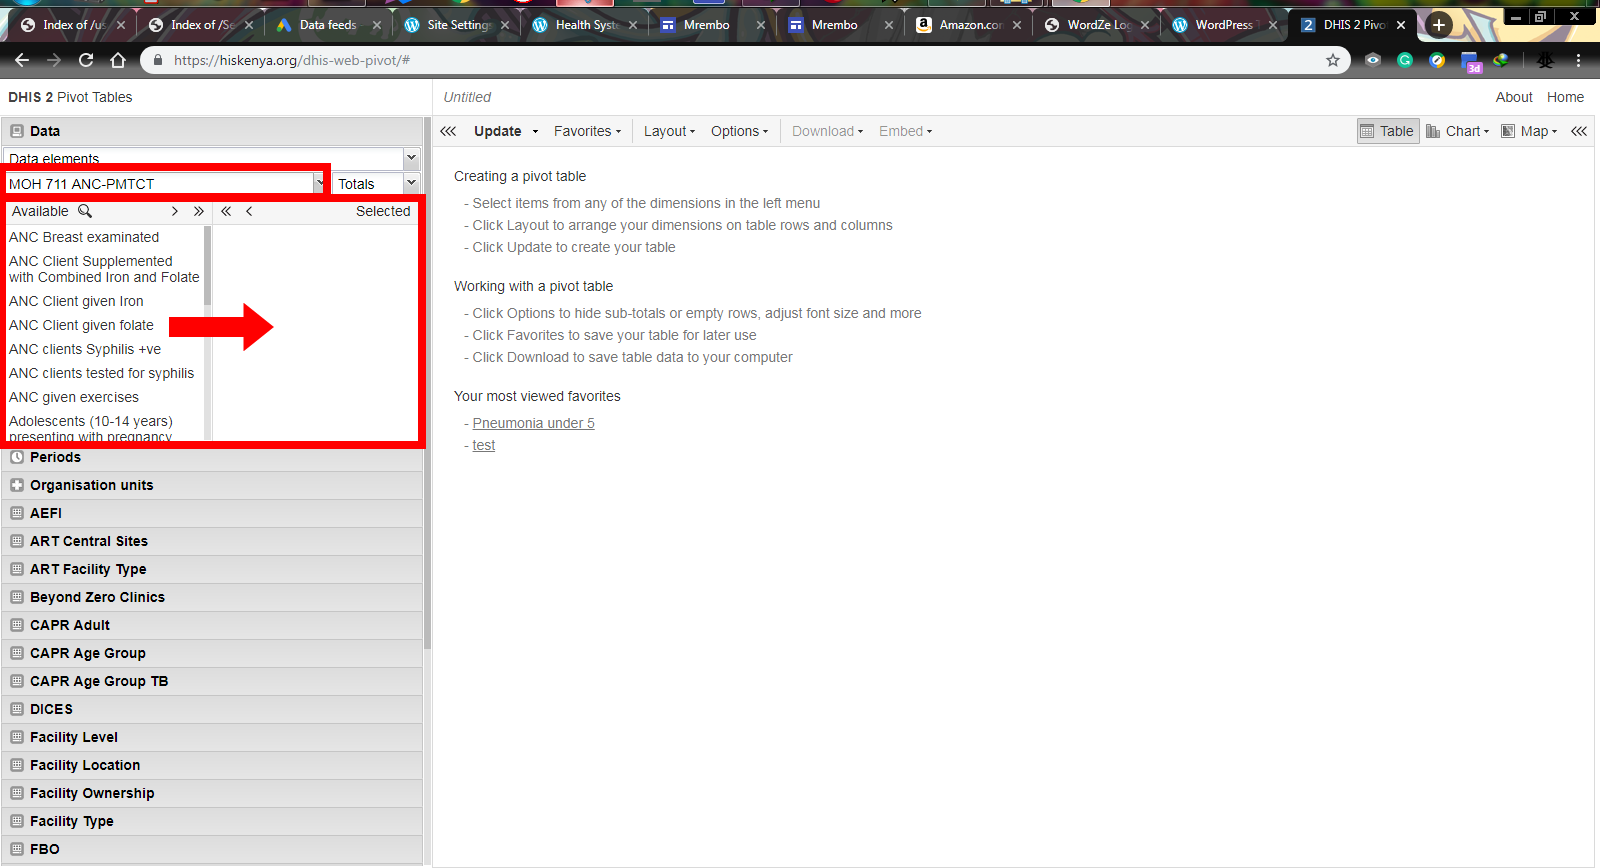
After the previous step, a list of all available data elements in the MOH 711 ANC-PMTCT group will be displayed. Select your desired data element by moving them to the adjacent space using the arrows as highlighted in the image above.
The single arrow selects one data element at a time while the double arrow allows for multiple data element selection.
After selecting the data elements you want, proceed to the next step to select the period for the health data you are interested in.
Step 4: Select the time period
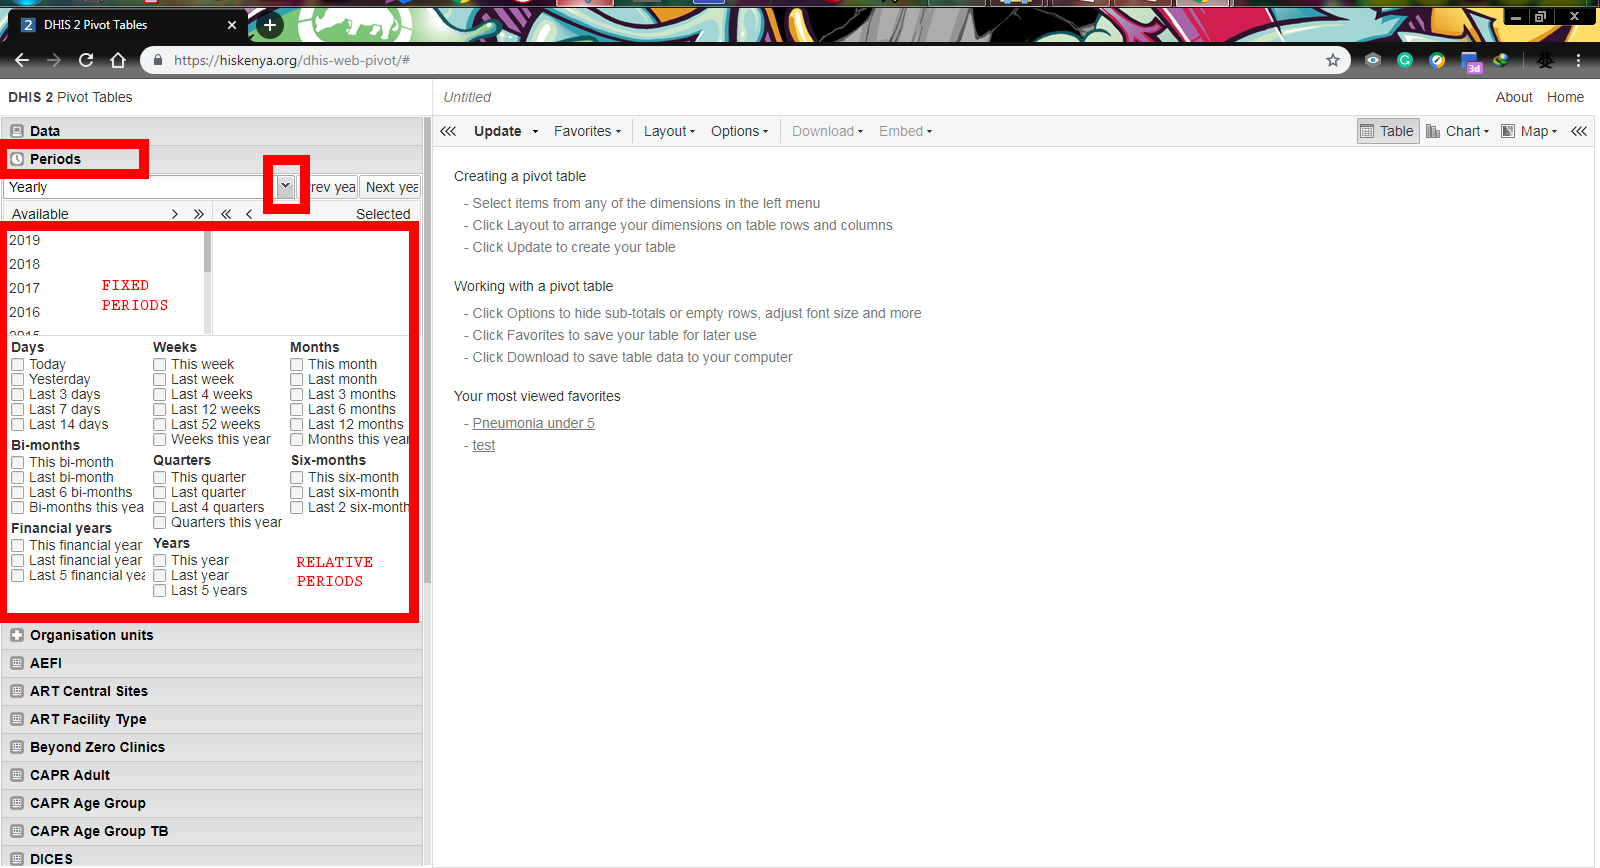
In the Kenya Health Information System pivot table, the period is categorized into 2 major groups i.e. fixed periods e.g. JULY 2019 and Relative periods e.g. last 12 months. By default, last 12 months is selected you can uncheck it if that’s not the period your interested in.
Criteria for selecting time periods is the same as above – using the single and double arrows as indicated in the image above. Proceed to the next step after you are through selecting your preferred time period.
Step 5: Select organization units
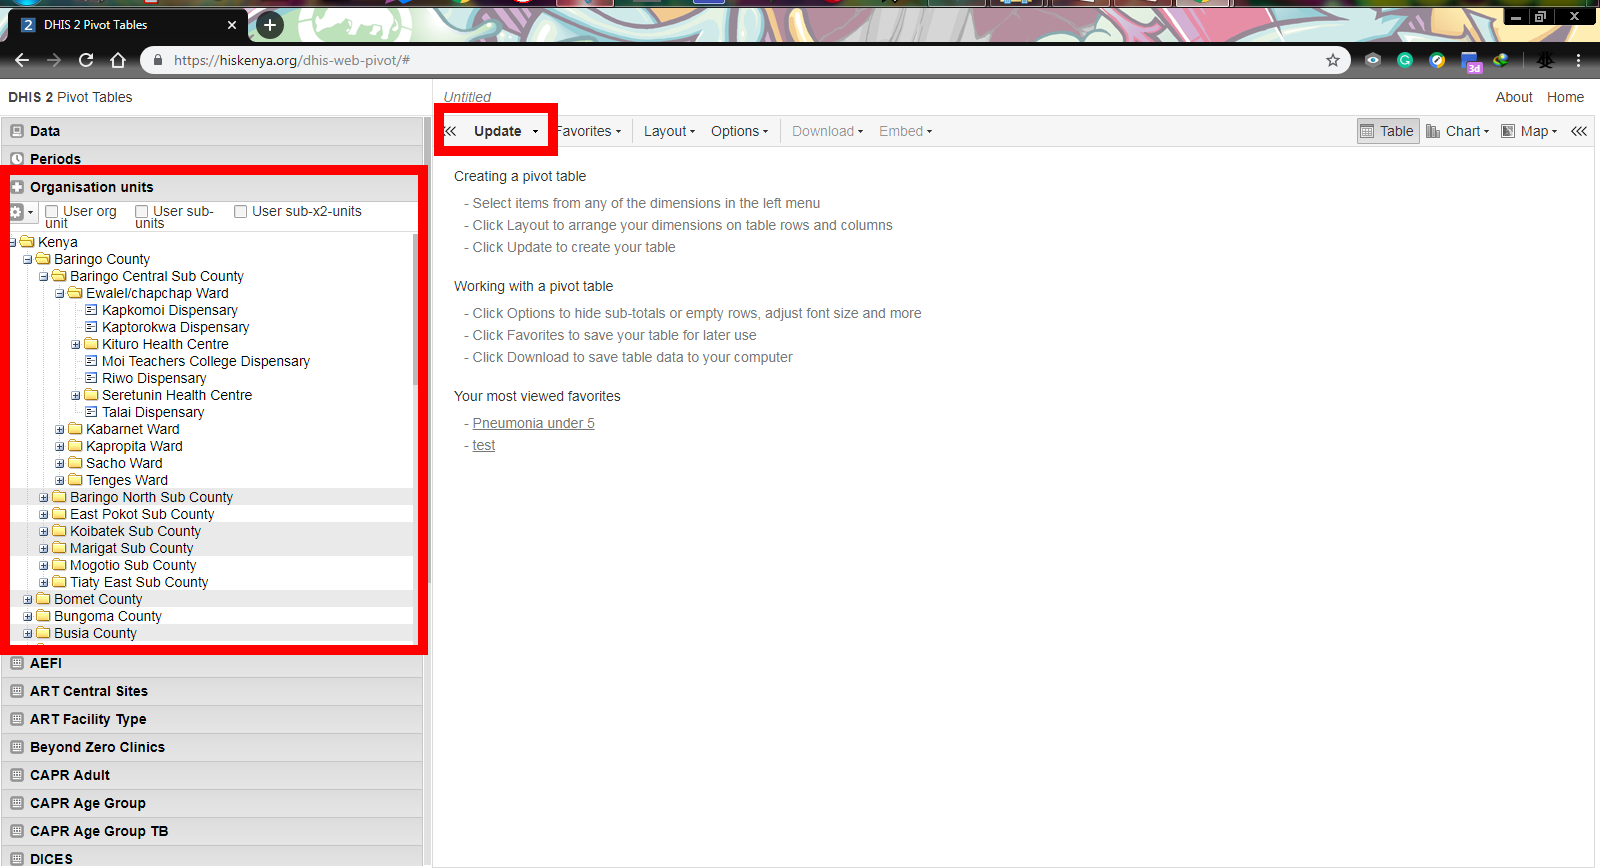
Click on the ORGANIZATION UNIT tab to display a hierarchical list of all available organization units in Kenya from counties to health facilities. Organization units in the KHIS Aggregate site are arranged in a parent-child hierarchy with counties being parent to sub-counties, sub-counties parents to wards and so on.
To display each parent’s children, click on the plus (+) sign found on the left side of each organization unit folder. Click on the desired organization unit to select it. The selected organization unit is going to be highlighted. To select multiple organization units, just click on one, and then click on the others while holding the CTRL key on your keyboard.
Click on UPDATE as shown in the above image to generate your pivot table in the KHIS/DHIS2 site. It might take a while for the pivot table to load depending on the amount of data being generated.
Congratulations! You have successfully created a pivot table using the Kenya Health Information System Aggregate site. In this step, am going to show you how to customize the pivot table you’ve just created to fit your specifications.
Step 6: Format the pivot table
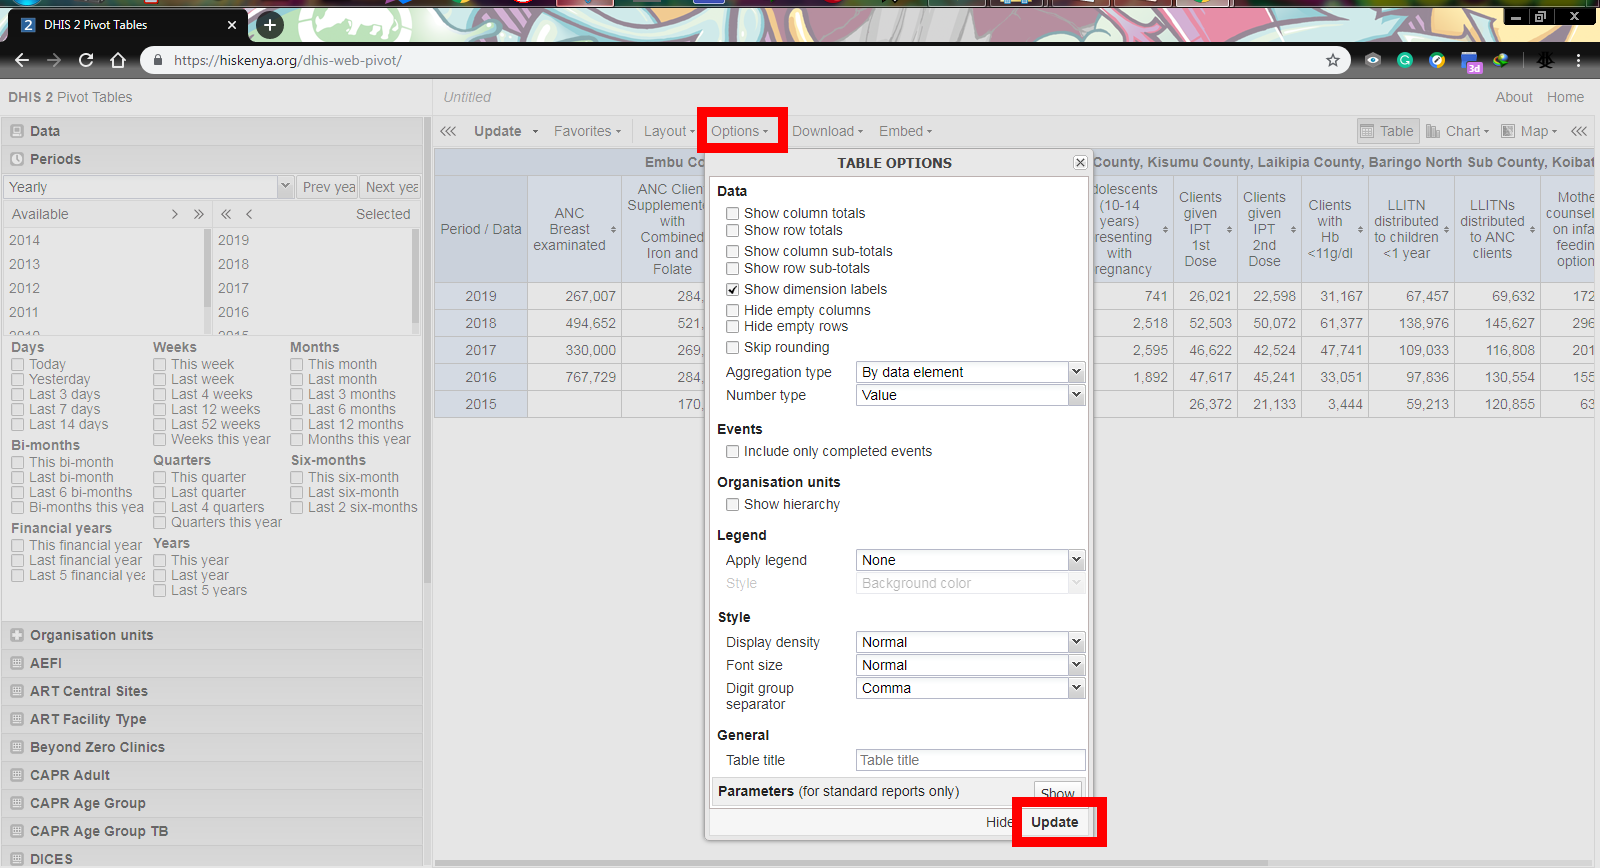
To format the pivot table, click on OPTIONS as indicated in the above image. Doing this will display a pop-up window with the various table options available. Check or uncheck your desired items then click UPDATE.
All changes made will now reflect in your pivot table.
Step 7: Customize the pivot table layout
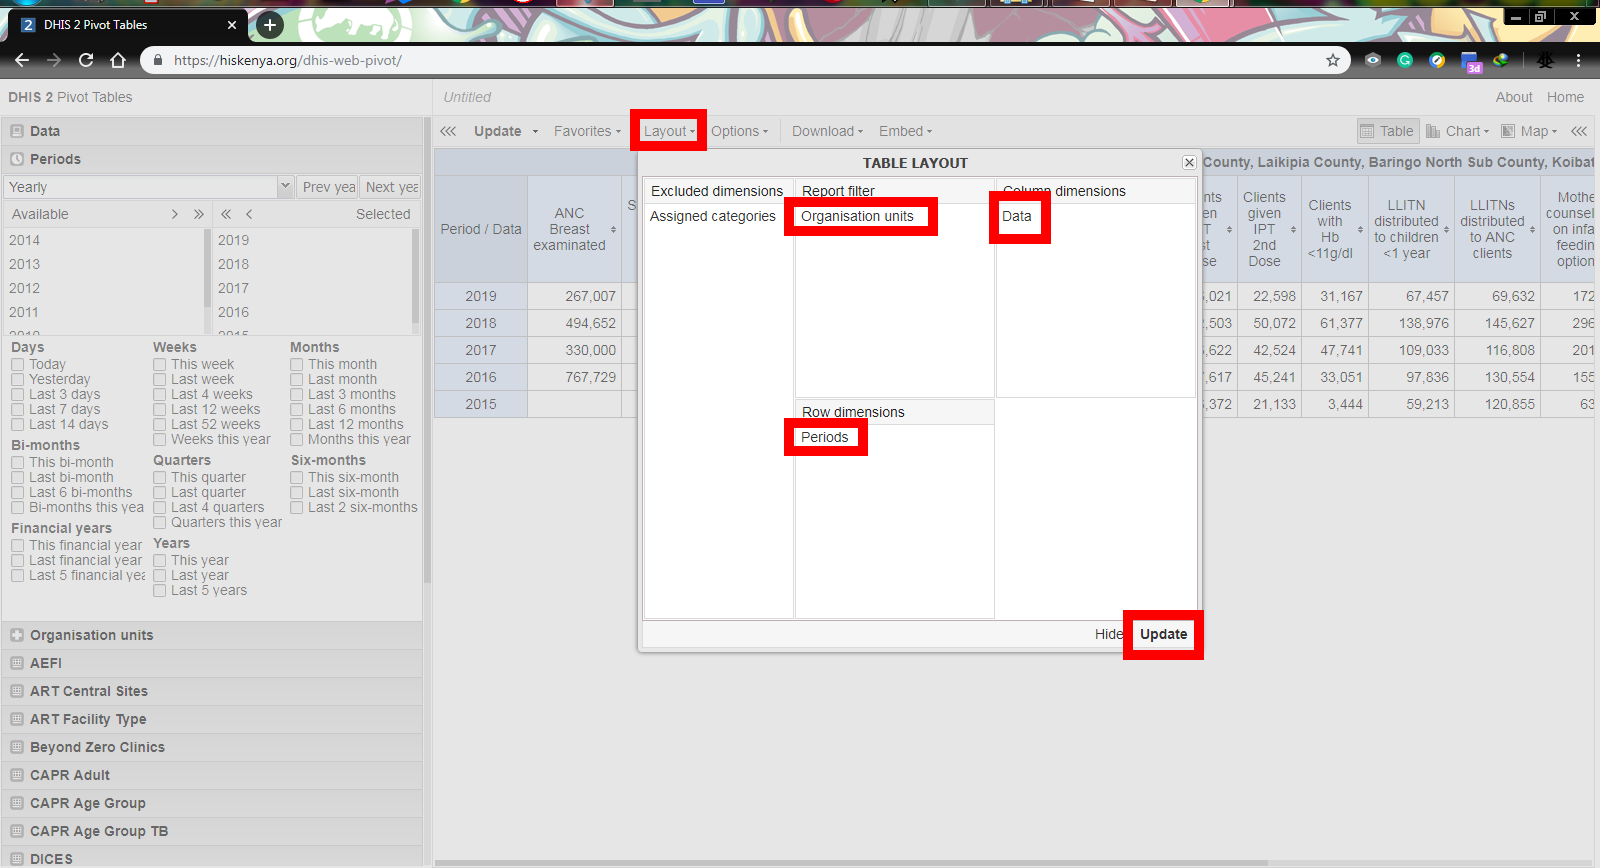
To customize how the different data dimensions will be displayed on your pivot table, e.g. columns and rows, click on the LAYOUT tab as shown in the above image. This will display a pop-up window showing the current arrangement of data dimensions.
To rearrange them simply drag and drop the data dimensions to where you see fit. After you are through, click UPDATE in order for the changes you’ve just made to reflect in your pivot table.
Step 8: Export the pivot table
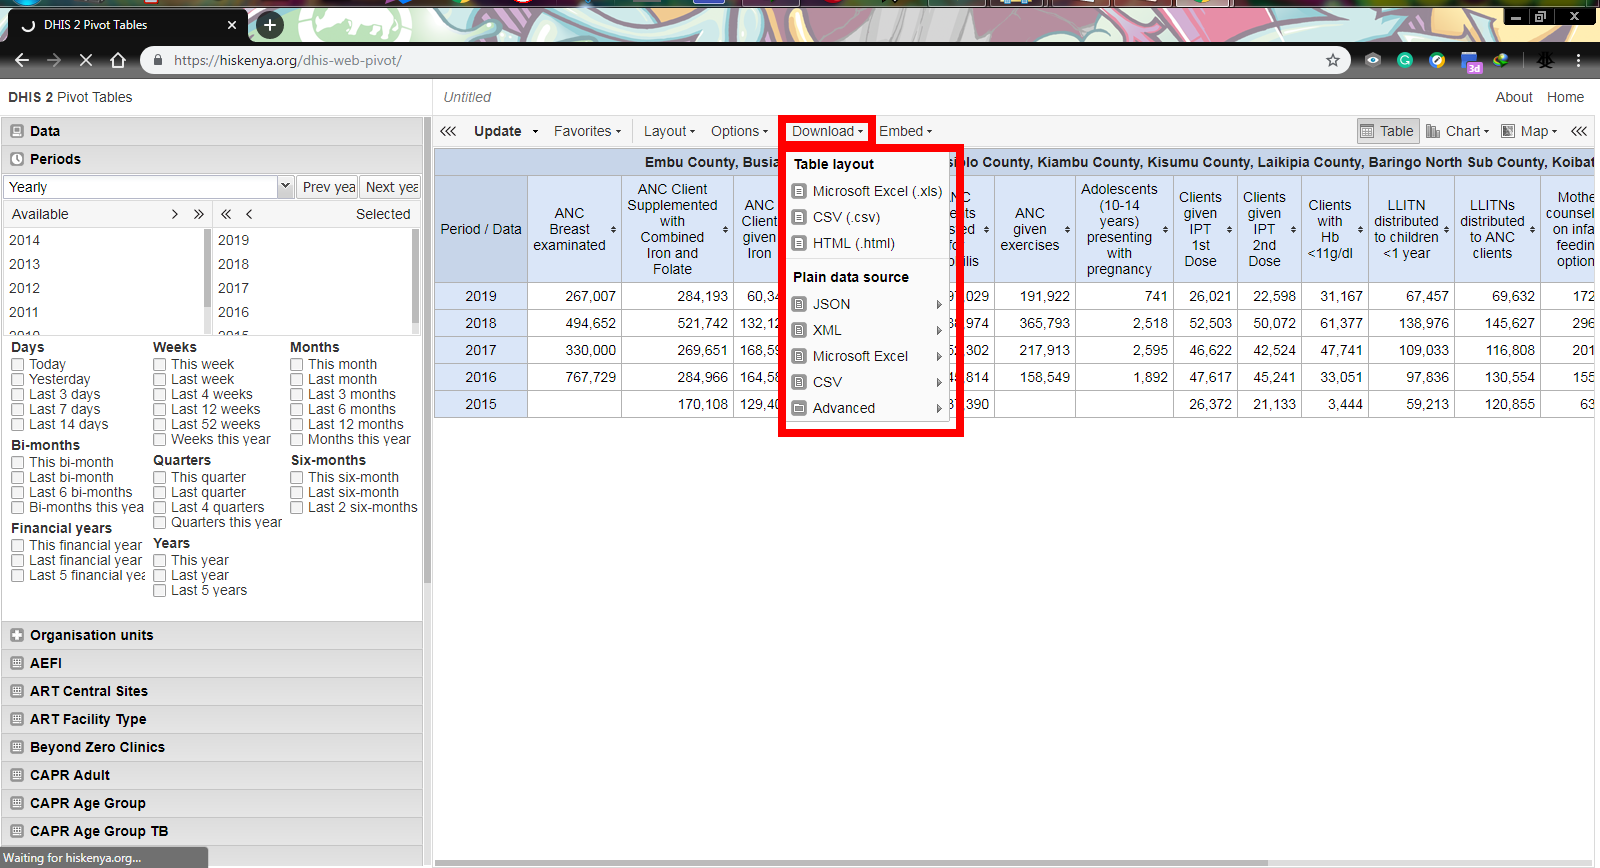
Now that you’ve created your pivot table and customized it to fit your health information needs, it’s time to export it. To do so, just click on the DOWNLOAD tab located at the top of the page. This will display a drop-down list of all the available formats.
Choose your preferred format and proceed to download your pivot table.
Step 9: Save your pivot table as favorite
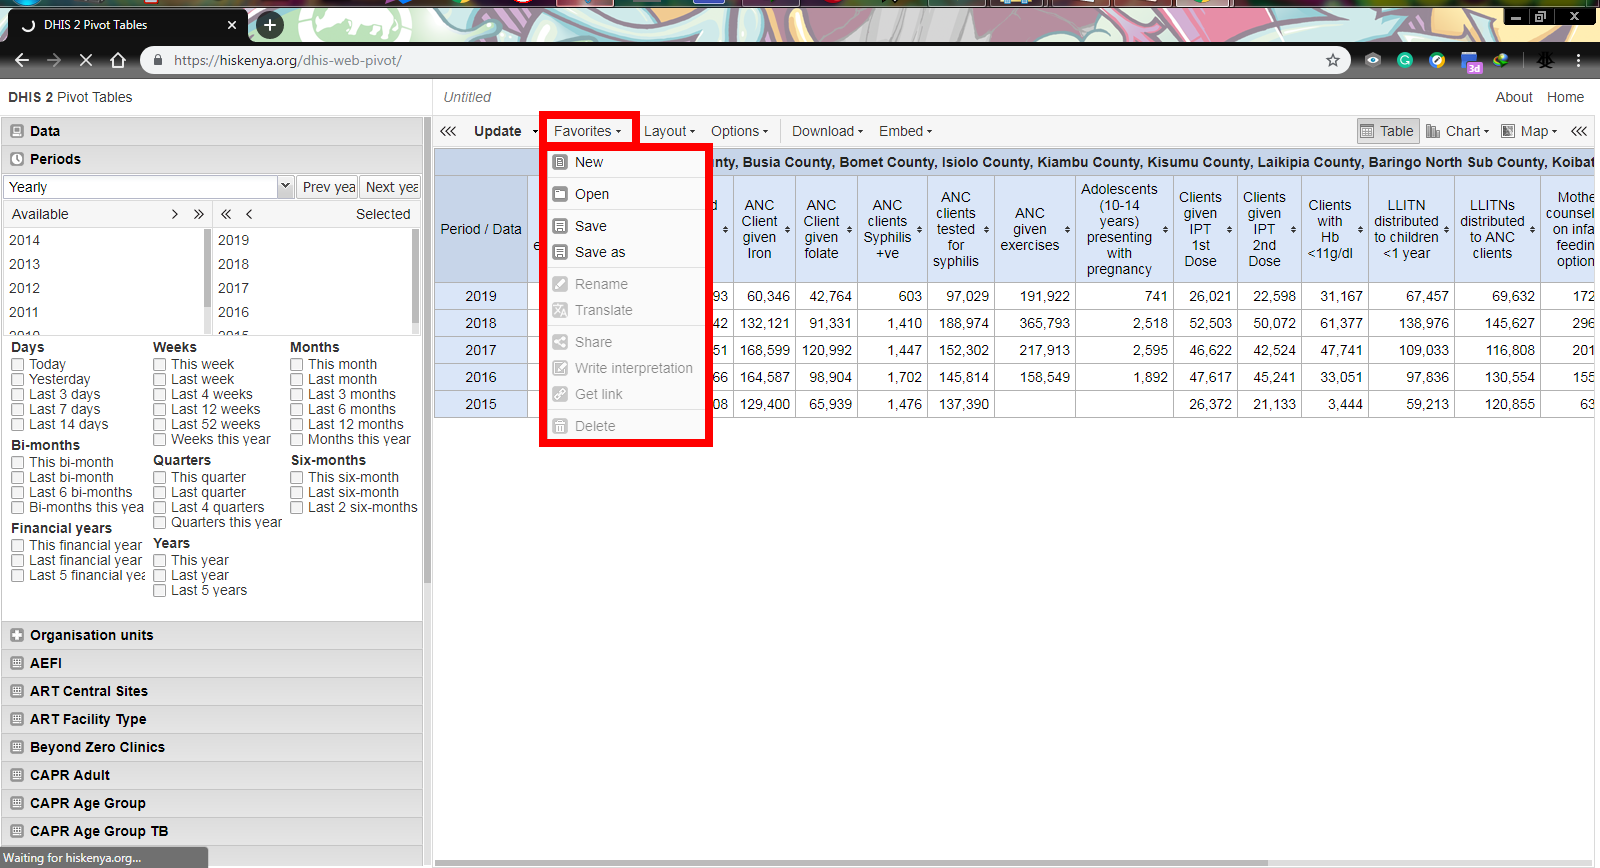
You can choose to save your pivot table as favorite to come back to it any time in the future. Which saves you time instead of generating another pivot table every time. To save your pivot table as favorite, click on the FAVORITES tab at the top of the page. Doing this displays with the options of either saving your pivot table, or opening a pre-existing one.
Saving a pivot table as favorite also allows you to share it with your colleagues since it will be visible to a select group of people of your choosing.
There you have it. You’ve successfully created a pivot table using the Kenya Health Information System software (KHIS/DHIS2).
Related Articles:
How to create pivot tables on Microsoft Excel
How to apply for a Kenya Health Information System software account
